
Selecting the Right Tools for Cutting LED Light Strips
When it comes to cutting LED light strips, having the right tools can make all the difference. The first tool you'll need is a sharp pair of scissors or a utility knife. It's important to choose a tool with a fine blade to ensure clean and precise cuts. Additionally, consider using a ruler or measuring tape to mark the desired length of the LED light strip before cutting. This will help you achieve accurate measurements and avoid any mistakes.
In addition to scissors or a utility knife, another tool that can come in handy when cutting LED light strips is a pair of wire cutters. These are especially useful if you need to trim any excess wires or connectors that may be attached to the strip. Wire cutters allow for precise cuts without damaging the LED lights themselves. Remember to use caution when working with wire cutters to avoid any accidental injury.
Overall, selecting the right tools for cutting LED light strips is crucial for achieving clean and accurate cuts. Having sharp scissors or a utility knife, along with wire cutters if needed, will ensure that the LED light strips are cut to the desired length without any damage to the lights or wires.

Understanding the Anatomy of LED Light Strips
LED light strips are composed of several key components that work together to create the desired illumination. The primary element of an LED light strip is the LED chips themselves. These tiny electronic devices emit light when an electric current passes through them. LED chips are typically arranged in long, continuous lines on a flexible circuit board. This design allows for easy installation and customization of the light strip. Additionally, LED light strips are encased in a protective covering, such as silicone or epoxy, to shield the delicate components from damage and ensure longevity.
Understanding the anatomy of LED light strips is crucial when it comes to fixing any issues that may arise. One common problem that users encounter is a malfunctioning LED chip. If a section of the light strip fails to illuminate, it is often an indication of a faulty LED chip. In such cases, fixing the LED light strip involves identifying and replacing the defective chip. This can be done by carefully removing the covering and locating the broken component. Once identified, the broken LED chip can be disordered and replaced with a new one to restore the functionality of the light strip.
Proper Safety Precautions for Cutting LED Light Strips
Cutting LED light strips requires careful attention to safety precautions to prevent accidents and injuries. One of the essential safety measures is to ensure that the power supply to the LED lights is turned off before attempting any cutting or modifications. This eliminates the risk of electric shock and protects both the individual handling the strips and the equipment being used. It is vital to double-check that the power source is fully disconnected and that there is no residual electrical current flowing through the wires.
Another crucial safety precaution when cutting LED light strips is to use the appropriate protective gear. Wearing gloves is highly recommended to safeguard the hands from any potential hazards. The gloves should be made of non-conductive material to provide insulation against electric currents. Additionally, safety glasses should be worn to protect the eyes from flying debris or accidental contact while cutting the light strips. These protective measures ensure that any potential accidents or injuries are minimized, enabling a safe and successful cutting process.
Step-by-Step Guide to Cutting LED Light Strips
To cut LED light strips, you will need a few tools including a sharp utility knife, a measuring tape, and a straight edge or ruler. Start by measuring the desired length of the strip and mark it with a pencil. Make sure to account for any connection points or wires that may need to be soldered later on.
Next, place the straight edge or ruler along the marked line and press it firmly to ensure a clean and straight cut. Hold the ruler securely in place with one hand and use the utility knife to score the top surface of the strip lightly. Repeat this process a few times until you have created a clear groove along the marked line.
Once the groove is created, apply slightly more pressure with the knife, cutting through the silicone material of the strip. Take care to maintain a steady hand and ensure the knife goes all the way through the strip. Finally, gently bend the strip at the groove to break it apart cleanly. Now you have successfully cut your LED light strip to the desired length and can continue with any necessary installation or soldering tasks.
Tips for Achieving Clean and Accurate Cuts on LED Light Strips
To achieve clean and accurate cuts on LED light strips, there are a few key tips to keep in mind. First and foremost, it is crucial to use the right tools for the job. A sharp utility knife or fine-toothed saw are the most commonly used tools for cutting LED light strips. When using a utility knife, ensure that the blade is fresh and sharp to prevent any jagged cuts or damage to the strip. For a more precise cut, a fine-toothed saw can be used, especially when cutting through thicker or more rigid strips.
Another important tip is to measure and mark the cut line accurately before making any cuts. Take the time to measure the desired length and use a straight edge or ruler to create a clear, visible line. This will help ensure that the cut is straight and precise, preventing any uneven or jagged edges. Additionally, consider using a pencil or marker with a fine tip for marking the cut line, as this will make it easier to see and follow during the cutting process.
By using the right tools and carefully measuring and marking the cut line, you can achieve clean and accurate cuts on your LED light strips. These simple tips will help ensure that your cuts are precise and professional-looking, enhancing the overall quality and appearance of your lighting installation.
Common Mistakes to Avoid When Cutting LED Light Strips
One common mistake to avoid when cutting LED light strips is not measuring accurately. It is important to carefully measure and mark the desired length of the strip before making any cuts. Failing to do so can result in uneven or mismatched sections, which can affect the overall aesthetics and functionality of the lights. Use a ruler or measuring tape to ensure precise measurements, and double-check before making any cuts to avoid costly errors.
Another mistake to avoid is using the wrong tools for cutting LED light strips. LED light strips are delicate and require specialized tools for clean and accurate cuts. Using scissors or improper cutting tools can damage the strip, resulting in frayed ends or uneven cuts. It is recommended to use a sharp utility knife or a pair of fine-toothed scissors specifically designed for cutting LED light strips. These tools provide clean and precise cuts, ensuring the longevity and performance of the lights.
Exploring Different Cutting Techniques for LED Light Strips
When it comes to cutting LED light strips, there are several different techniques that can be employed. One common technique is to use a sharp utility knife or box cutter. This method allows for precise cuts and clean edges, making it ideal for more intricate designs or patterns. Another technique is to use a pair of sharp scissors. Scissors are easier to handle and maneuver, making them a great option for beginners or those who prefer a simpler approach. However, it is important to note that scissors may not provide the same level of precision as a utility knife.
For those who prefer a more professional approach, a hot knife is a popular choice. A hot knife uses heat to melt through the LED light strips, creating clean and seamless cuts. This technique is commonly used by contractors or experienced individuals who need to make precise cuts in a short amount of time. However, it is important to exercise caution when using a hot knife, as the blade can become extremely hot and cause burns or injuries if mishandled.
Overall, the cutting technique you choose will depend on your personal preference, the complexity of your project, and the level of precision required. It is advisable to practice on scrap pieces before making cuts on the actual LED light strips to ensure you achieve the desired results.

How to Fix a Cut LED Light Strip
When a LED light strip is cut, it has the potential to encounter various issues that may require fixing. One common problem is improper connectivity between the cut sections. To fix this issue, it is recommended to use soldering or adhesive connectors. Soldering provides a secure and long-lasting connection, ensuring that the individual cut sections work together seamlessly. Adhesive connectors are a simpler alternative, as they only require peeling off the protective backing and pressing the sections together. Whichever method you choose, ensure that the connection is secure and that the positive and negative terminals are correctly aligned. This will ensure the proper functioning of the LED light strip.
Another issue that may require fixing is the loss of brightness or inconsistent lighting along the cut sections. This can be resolved by adding a power source directly to the cut sections. By doing so, you are eliminating any voltage drop that may occur along the longer strip, providing a consistent power supply to the individual cut sections. The simplest way to fix this is to use a power injection connector. These connectors are specifically designed to provide power to cut sections, allowing them to maintain the same brightness as the rest of the strip. By addressing these common issues, you can successfully fix a cut LED light strip and enjoy the consistent and vibrant lighting it provides.
Troubleshooting Common Issues with Cut LED Light Strips
When it comes to troubleshooting common issues with cut LED light strips, there are a few key problems that often arise. One of the most common issues is uneven brightness or color variation along the strip. This can be caused by a few different factors, such as improper soldering or a mismatch between the power supply and the LED strip. To resolve this problem, it is important to check the connections and ensure that everything is properly soldered and secure. Additionally, double-checking the power supply specifications and making sure it is compatible with the LED strip can help to eliminate any potential mismatches.
Another common issue is flickering or flashing of the LED lights. This can be quite frustrating, as it disrupts the overall lighting effect. Flickering or flashing is often caused by an insufficient power supply or a loose connection. To troubleshoot this problem, it is recommended to check the power supply and ensure that it is providing enough voltage to drive the LED lights effectively. Additionally, checking the connections and making sure they are secure can help to eliminate any potential loose connections that may be causing the flickering or flashing. Overall, paying attention to the power supply and connections is essential when troubleshooting these common issues with cut LED light strips.
Enhancing the Durability of Cut LED Light Strips
Enhancing the durability of cut LED light strips is crucial to ensure their long-lasting performance. To achieve this, one important step is to properly seal the cut ends of the strips. By using silicone sealant or heat shrink tubing, you can effectively protect the exposed copper wires from moisture and dust. This not only prevents potential short circuits but also extends the lifespan of the LED light strips.
Another method to enhance durability is to reinforce the connections between cut LED light strips and their power source. Using soldering or connectors specifically designed for LED light strips, you can create secure and reliable connections that minimize the risk of loose wires or faulty connections. Additionally, it is recommended to provide extra support for the cut sections by securing them with adhesive or clips. This prevents the strips from bending or twisting, reducing the strain on the connections and enhancing their longevity. By taking these measures, you can significantly enhance the durability of cut LED light strips and ensure they continue to illuminate your space for years to come.
Creative Ideas for Repurposing Cut LED Light Strips
LED light strips are not only versatile in their applications but can also be repurposed in creative ways once they have been cut. One idea is to use the smaller cut sections to create unique DIY lighting fixtures. By attaching the cut LED light strips to a piece of wood or metal and adding a power source, you can create a one-of-a-kind pendant light or wall sconce. This allows you to add a personal touch to your space while making use of the leftover pieces.
Another creative repurposing idea for cut LED light strips is to use them in craft projects. The small and flexible nature of LED light strips makes them perfect for adding a touch of illumination to various crafts. For example, you can incorporate cut LED light strips into homemade greeting cards, creating a visually stunning effect when the card is opened. Additionally, you could use them to enhance the appearance of decorative items such as vases or picture frames, adding a subtle glow that can transform the overall look. With a little creativity, the possibilities for repurposing cut LED light strips are endless.
Maintaining the Aesthetics of Cut LED Light Strips
Maintaining the aesthetics of cut LED light strips is crucial to ensure a seamless and professional look in your lighting application. Proper care and attention to detail can go a long way in preserving the visual appeal of your cut LED light strips. First and foremost, it is important to handle the cut strips with care to prevent any damage or bending. Avoid applying excessive force or pressure while handling them, as this can cause the LED chips to become dislodged or the strip to break.
Additionally, be mindful of the installation process to maintain the aesthetics of your cut LED light strips. Make sure to clean the surface thoroughly before adhering the strips, as dust or debris can interfere with the adhesive and impact the overall appearance. When placing the strips, ensure they are properly aligned and straight for a neat and professional finish. Moreover, if you need to make any connections or extensions between cut strips, use proper connectors and take care to secure the connections tightly to avoid any loose or unsightly wiring.
Maintaining the aesthetics of cut LED light strips is not only about the physical condition but also about their performance. Regularly inspect the strips for any signs of flickering, dimming, or uneven illumination. If you notice any issues, troubleshoot and address them promptly to maintain the desired look. Additionally, consider the ambiance and color temperature of the LED light strips, as they can greatly impact the overall aesthetics. Choose the appropriate color and adjust the brightness as needed to create the desired visual effect. By consistently assessing and addressing any issues, you can ensure that your cut LED light strips continue to enhance the aesthetics of your space for a long time to come.
Expert Advice on Cutting and Fixing LED Light Strips
Cutting and fixing LED light strips can be a daunting task, especially if you're not familiar with the process. However, with the right tools and expert advice, you can achieve clean and accurate cuts, as well as fix any issues that may arise. When it comes to cutting LED light strips, precision is key. Make sure you have a sharp utility knife or a pair of sharp scissors on hand. These tools will allow you to make precise cuts without damaging the delicate components of the strip. Additionally, it's important to measure twice and cut once to ensure that you achieve the desired length. Taking the time to plan your cuts will save you from unnecessary frustration and waste.
Fixing cut LED light strips may be necessary if you accidentally damage the strip during the cutting process or if you encounter any functional issues later on. One common problem is when the strip fails to light up at the cut point. In such cases, you can use soldering to fix the connection. By carefully soldering the cut wires together, you can restore the continuity of the electrical circuit and ensure proper functionality. It's important to pay attention to the polarity of the wires and to use heat shrink tubing or electrical tape to insulate the soldered joint. This will prevent any short circuits and ensure the safety and longevity of your LED light strips.
What tools do I need to cut LED light strips?
To cut LED light strips, you will need a pair of sharp scissors or a utility knife. Additionally, a ruler or measuring tape can be helpful for accurate cuts.
How do I ensure safety when cutting LED light strips?
It is important to unplug the LED light strip before cutting it to avoid any electrical accidents. Also, wear protective eyewear and gloves to protect yourself during the cutting process.
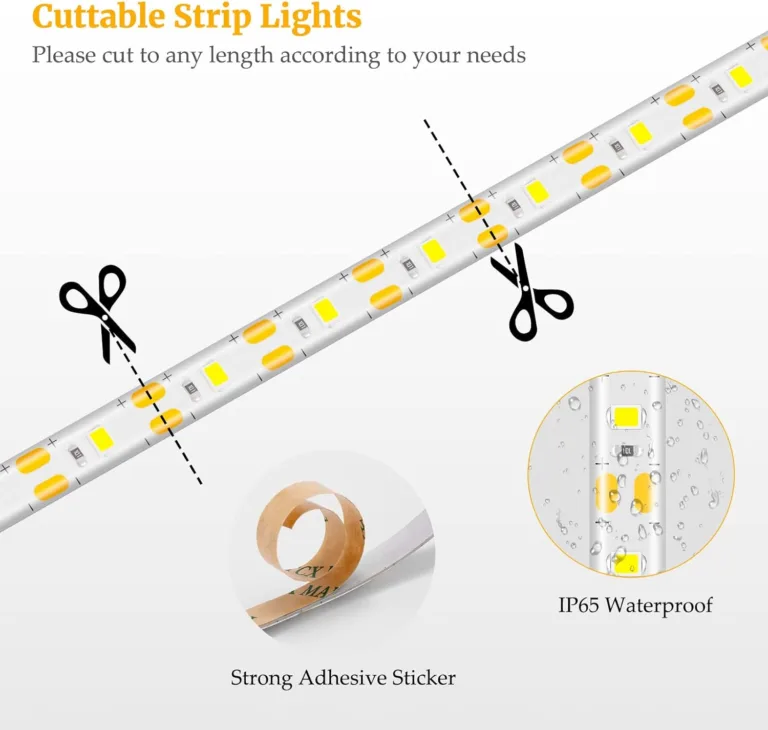
Can I cut LED light strips to my desired length?
Yes, LED light strips are designed to be cut to your desired length. They usually have cutting points or marked lines where you can safely cut them without damaging the lights.
What are some common mistakes to avoid when cutting LED light strips?
Some common mistakes to avoid include cutting through the copper contacts, not following the marked cutting lines, and not properly securing the cut end of the strip.
How can I achieve clean and accurate cuts on LED light strips?
To achieve clean and accurate cuts, make sure to use sharp tools and cut along the marked lines. Take your time and use a steady hand to ensure a precise cut.
How can I fix a cut LED light strip?
To fix a cut LED light strip, you can use connectors or soldering to join the cut ends together. Alternatively, you can use adhesive clips or tape to secure the cut end to a power source.
What are some common issues with cut LED light strips and how can I troubleshoot them?
Common issues with cut LED light strips include flickering, uneven lighting, or complete failure. To troubleshoot, check the connections, ensure proper voltage, and inspect for any damaged or loose wires.
How can I enhance the durability of cut LED light strips?
To enhance durability, you can use silicone sealant or heat shrink tubing to protect the cut ends from moisture and damage. Additionally, avoid bending the strip too tightly to prevent stress on the wires.
What are some creative ideas for repurposing cut LED light strips?
Cut LED light strips can be used for various creative projects such as accent lighting in cabinets, under stairs, or behind mirrors. They can also be used for DIY lighting fixtures or even to create decorative signs.
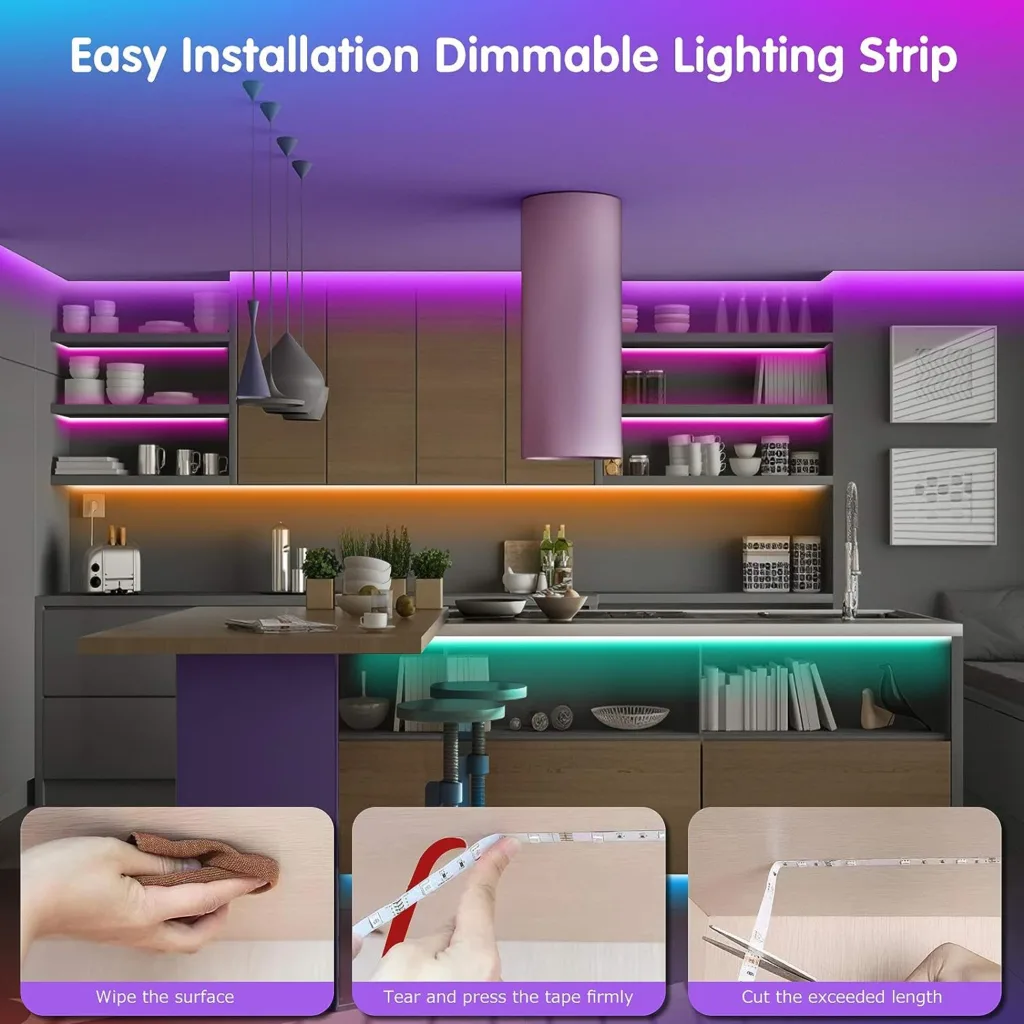
How can I maintain the aesthetics of cut LED light strips?
To maintain the aesthetics, make sure to clean the surface where the LED light strip will be mounted and remove any dust or debris. Additionally, use proper mounting techniques to ensure a neat and organized appearance.

